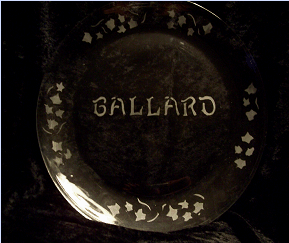
Graduation gift- Glass Photo frame with the name and year or "Congrats Grad" 2008 or add the year and name to a glass plate or coffee mug for a special graduation keepsake.
Baby Gift-Etch a mirror for Baby"s room with Name, Birth date and weight; Etch a Glass Picture Frame with Baby's name for a special gift; Etch a Glass Plate with Baby's name, date of birth and weight for a family heirloom; etch a Glass Ornament with Baby's name and Birth date for a Baby's First Ornament.
Wedding Gifts- Putting the Bride and Grooms name on a glass plate; mirror, champagne flutes; or candle glass creates a lovely lifelong memory
keeper. You can also add the date of the wedding if you would like. Take a hurricane candle globe and etch it with wedding rings and their names.
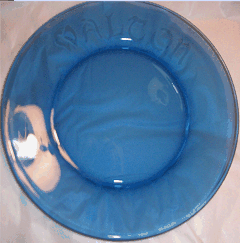
Anniversary gifts-Light Blue Glass Plates can be etched for 25th wedding anniversaries and pale gold or yellow for 50th wedding anniversaries.
You could do something as simple as the family Initial or go into more detail by adding names and dates. I have even used clear glass picture frames trimmed in silver and gold for the anniversaries and added the family name for the couple to display an anniversary picture in.
Etching a bottle of wine with a family name and Happy 25th and
include personalized wine goblets would be a special gift.
Christmas Gifts- Personalize Glass Christmas Ornaments with Initials and give to the family in a big glass personalized bowl that they can use on special occasions for fruit salad or everyday for popcorn. Personalize a plate with a family name and fill with cookies or candy so that when the goodies are gone- the treasured gift is discovered! Personalize a glass coffee mug or tea cup and fill with a gourmet blend of their favorite brew and a gift coupon promising to stop by for a relaxing cup and a catch up chat.
The ideas are endless so browse craft and hobby stores as well as local flea markets and tag sales for your next glass find and start creating!
Step 1 - Decide on your style of glassware and clean it well to remove residue and fingerprints. You will add more but you might at least start with a clean piece.
Step 2 - Determine the name or symbol you wish to etch being very careful that the size of the etching fits well onto the glassware.
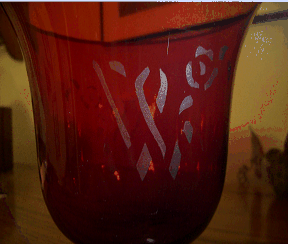
Step 3- Using a stencil or print out from the internet (stencil is much easier!) trace your stencil onto the plastic side of a piece of clear contact paper or lamination paper. If you are placing the design/letters on the front side of the project such as a glass ornament or goblet, trace as normal. Remember if you are doing a design to be placed on the back of the plate or inside of a bowl to read on the outside you will need to write the the word or draw the design in reverse. For example if you are writing SMITH, it will need to be written HTIMS with each letter reversed as well. Trust me when I say I have been doing this for years and still frequently mess this up. The best thing to do is to trace the stencil and pretend that you are applying it to the plate and turn the front side of the plate towards you to view how it will be read. I trace my stencils in ink and go over it several times to make it easy to see.
Step 4- If you are happy with how your stencil looks and have held it up to see that it can be read properly it is ready to apply. Trim around the stencil to approx.1" or smaller if working on a very small area. Large stencils may need to be cut into two or three pieces to be more manageable. Peal off the paper backing and apply to your glassware. If you are applying it to a curved surface like the edge of a plate or an ornament ball you will need to start in the center and smooth towards the edge. You may need to take a razor knife and cut through the ridges and bubbles that will occur and overlap those edges and seal with the flat of your fingernail.
Step 5 - Again, check your stencil after you have applied it to ensure it is readable and not backward or reversed. It is much better to catch that detail now than later. Also make sure you have smoothed out your stencils and and there is good adhesion where you will cut.
Step 6- If everything still suits you, cut out your stencil with a razor knife using smooth lines and not jerky movements, trying not to leave jagged edges as you go. Use the tip of the razor knife to peal back the inside of the stencil to expose the glass area you wish to etch.
Step 7 - When all of the areas to be etched are open, view your project one more time. This is the last opportunity to fix any problems, misspellings or backwards letters. If everything is the way you want it, apply Etching Cream with a disposable paintbrush over the stencil cut-out areas making sure it does not come in contact with your skin, eyes, nose, mouth or any other part of the glassware you did not want etched. Follow the directions on the Etching Cream well!
Step 8 - Rinse according to Etching Cream instructions, dry completely and "TA DA" you will have a beautiful etched project. At this point you may add silver Rub-N-Buff if you wish your project to stand out more but I suggest you try it on a sample etched project first to see if you like the look.
Have Fun Creating!!
You will need :
-Glassware of your choice- (Pyrex does not work)
-Armor Etch Etching Cream
-Roll of clear contact paper or lamination paper - 1 roll goes forever
-Stencils of your choice or you can print something off of the web and apply the clear contact paper or lamination to it to create your own stencil. I have always just had much better luck with stencils.
-Disposable paint brush
- Eye protection, rubber or plastic gloves and work surface protection is recommended.
-Razor knife, scissors, ink pen and running water available to rinse glassware